Tuesday, July 30, 2013

strawberry savarin; a tuesdays with dorie rewind

a while back, the tuesdays with dorie bakers made the savarin recipe.  first we mixed up a batch of baba au rum dough.  it was ridiculously easy to do-a simple yeasted cake batter was placed in a pan and allowed to rise for a brief period.

look at how light and fluffy it is, and it rose so quickly too!  it baked up fast as well.

we made a simple syrup to soak the cake with.  apparently, that is the key to an authentic savarin, lots of syrup soaked up by the cake.

by spooning small amounts over the cake, it all gets absorbed.

to decorate it, lots of whipped cream and fresh berries.  a classic, a true classic.  i brought it to a potluck dinner, i blinked, i missed it.  all i got was the dirty plate.  good thing they are easy to make, if i want to try this one myself, i will have to make it again.  and when i do, i'm not sharing...to see what the other bakers came up with, check out the tuesdays with dorie page.

Monday, July 22, 2013

searching for the perfect chocolate chip cookie

we all have vivid food memories.  that ability to recall and reminisce a flavor or a texture or the fragrance of foods we have eaten.   whether it is connected to a happy, family event or a person special to us, or maybe some other reason, the fact is, we can smell it or taste it in our memory.
one of my memories surrounds chocolate chip cookies.  the kind that come from old fashioned bakeries in the north east.  they were a little sandy, a little salty but crispy and were loaded with chocolate chips.  at that first bite, little crumbs would rain down.  i love the salty-sandy texture in a cookie.  crispy but not hard; no threat to the dental work.
my yearning for that texture, that flavor had me searching for old fashioned cookies and i came across a recipe from daily delicious.  i made a test batch, 1/4 of the recipe.  in place of butter and oil called for in the recipe, i used only coconut oil.  i also added a few extra chocolate chips (just to land at an even amount) and some walnuts because i like them in a chocolate chip cookie.  they were good.  not what i was hoping for, but still good.  the memory persists so the search will continue...

Sunday, July 21, 2013

beating the heat with a twist from bobbie's dairy dip


it's hot and humid out there.  frying egg on the sidewalk hot-just ask my husband.  he has been walking around with a hand held infrared thermometer taking surface temps on anything that doesn't move.  cats, dog, me; you name it, he has probably read the temp on it.  to find him something else to do, i suggested a trip to bobbie's dairy dip for a cone.  

ice cream is one of my favorite things.  especially chocolate ice cream.  chocolate ice cream loaded with fudge and peanut butter and chunks of candy bars...but despite my chocolate obsession, i have always had a thing for a cone of soft serve.  my preference is a vanilla soft serve and i do not mean yogurt, i mean the traditional vanilla flavored frozen treat-is it even really ice cream?  not important.  the rush to eat it before it is melting and dripping down my arm may give me a brain freeze, but i do not care.  it is the tastiest way to beat the heat.

 bobbie's dairy dip has been in business since 1951.  the newest owners took over in 2006.  the menu includes burgers and fresh cut french fries-they smelled tempting.  we stuck to the cones-priorities...

 the pick up window

 our cones.  two medium twists came to less than $5-that beats most places in town.  sure the high end places may have better quality but, every now and then, you just gotta do the soft serve.

 a medium cone is a lot of ice cream.  on a hot day, you have to be quick about it or it drips all over.

 it was that good...

beat the heat-head to bobbie's dairy dip!

they do not have a website but do have a facebook page

for the most info on the menu and reviews, visit urban spoon, nashville scene, nashville scene foodblog-bites

Tuesday, July 16, 2013

summer vegetable tart; a tuesdays with dorie challenge

this week, we made a vegetable tart using phyllo dough for the crust.  i knew i had a package lurking in the freezer and i decided to use it rather than buy a new package.  should have just bought the new one...this dough, even though it thawed in the fridge for a day, was not going to cooperate.  it came apart in pieces.  there was no way to get the required 4 sheets and cut them in half.  there was no way to make a shell using 8 half sheets, layed in an overlapping manner.  my shell was a total hack job and i am certain i used more than 4 sheets.
and that folks, is as pretty as it gets.  the directions called for 1/2 a cup of clarified butter.  i simply melted 3 tablespoons and and honestly, it was more than enough-i used about half.  after prebaking the shell, i worked on the filling.
banana peppers from the garden, portobello mushrooms, onions, spinach, garlic, a few cherry tomatoes and a handful of basil, oregano and thyme.  to keep the tart from weeping excessively, i cooked it slowly over low heat.
we watch our cheese consumption here and i am not a goat cheese fan.  this tart had about a cup of blended feta, fontina and romano cheeses, most of it sprinkled over the top.  a quick trip under the broiler gave it a little bit of a melt but not much.
it was mostly vegetable, perfect for summer.  honestly, i would rather have this on a pizza crust with a little white sauce.  the phyllo dough crust just didn't do much for me.  it certainly was not easy to serve-it was hard to cut cleanly, the crust was not strong enough to support the weight of the filling.  the cheese did not glue it together either.  from a cookbook authors point of view, it was easy to see why they did not include a photo, even a small black and white one; this thing was not pretty.  even so, my husband devoured it and declared it a success.  go figure...

to see what all the other participants made, check out the tuesdays with dorie page.  interested in baking along?  get a copy of the book and jump right in, we'd love to have you join us!

Thursday, July 11, 2013

maple pecan cake with a cinnamon ribbon

sometimes, things go according to plan.  sometimes, they do not.  this cake landed somewhere in the middle of maybe.  what i wanted and what i got were close, but... either way, it was a really nice cake with a few surprises.

first surprise was peeking into the oven at the half way mark and realizing that the crumb topping had sunk below the surface of the cake.  that was a little worrisome.  crumb topping needs to be on top to get that typical crunchy texture of a good struesel.  when it sinks down into the cake, it can be gummy and oily.  this recipe yielded a moist ribbon which was not at all gummy.  the second surprise was that a small amount of the crumb topping actually remained around the edges on the top of the cake giving it a nice crunch.

the biggest surprise was in flavor.  to flavor this cake, i chose a grade b maple syrup because they are supposed to have more flavor than a grade a.  honestly, i didn't get a clear maple flavor at all, and i do not think anybody else did.  perhaps the use of maple sugar would be better or a little pure maple flavoring or some combination of the three but that question will have to be answered on another day.  in the mean time, if you are wanting a piece of cake to have with your afternoon cup, this is an easy cake to make and despite the results, a tasty way to satisfy a sweet tooth.

maple pecan cake 
serves about 8

2/3 cup chopped pecans
1 1/2 cup all purpose flour
1 teaspoon cinnamon
3/4 teaspoon baking soda
6 tablespoons unsalted butter, softened
2/3 cup light brown sugar
1/2 teaspoon vanilla
1/4 teaspoon salt
3/4 cup grade b maple syrup
1 egg
1/2 cup buttermilk
crumb topping/ribbon recipe follows

preheat the oven to 350.  grease and flour a small bundt pan, approximately 8 cup capacity.   toast the pecans by spreading them in a thin layer in a baking dish until they are fragrant, about 5 minutes.  set the nuts aside to cool.  place the flour, cinnamon and baking soda into a mesh strainer or a sifter and sift together onto a piece of paper.  cream the butter with the brown sugar, vanilla and salt until it is light and fluffy, about 2-3 minutes.  add the syrup slowly while the machine mixes.  scrape the bowl well.  add the egg and mix in.  add the flour in batches and alternate it with the buttermilk, folding gently until combined.  scrape the batter into the prepared pan.  sprinkle the crumb topping evenly over the top of the batter and bake until a tester comes out clean, about 50-55 minutes.  allow the cake to cool in the pan for 15 minutes and then turn it out onto a rack to cool completely.

crumb topping
1/4 cup dark brown sugar
1/4 cup all purpose flour
2 tablespoons unsalted butter, cold and cut into cubes
1 teaspoon cinnamon
place all of the ingredients into a bowl and rub together with your finger tips to make a crumbly struesel topping.  

Tuesday, July 9, 2013

herbs are summer workhorses in the garden; homemade buttermilk ranch dressing


what is one of the best kept secrets of gardening?  herbs thrive in poor conditions.  they can be a bit like weeds.  just about the only thing they cannot do without is water.  most of them will even soldier on in less than full sun conditions.  the hardest part of caring for fresh herbs is to keep the annuals from setting blooms; once they flower, they go into seed production and stop producing the leafy parts we cook with.  unlike zucchini,  there is no shortage of recipes to use them in.  one of my favorite recipes is for homemade ranch dressing.  when you are trimming off the flower stalks to parsley and dill, go a little further and take enough off the plant to mix up a batch of fresh buttermilk ranch dressing.

in my herb garden, i have a combination of green onions, chives and chinese leeks.  on the left, those are green onions-scallions if you prefer.  on the right, chinese leeks which are very similar to garlic chives.  the difference is in how they produce the leaves.  chinese leeks and garlic chives look very similar to miniature leeks-the greens branch out from the top of the white part.  for chives, each one is single tube with a bulb.

parsley is a great plant in the garden.  it is a host plant for butterflies such as swallowtails.  it makes an edible border or edging plant and it will help attract beneficial insects such as minute pirate bugs and tachinid flies.

parsley is a biennial plant.  that means the first year, it will grow and produce leaves and a strong root system.  the second year, it will shift into the production of flowers and ultimately, seeds, called bolting.  because parsley will bolt, many gardeners treat it as an annual and pull it out at the end of the season. the large leaves on the left are from a plant that has not bolted while the smaller ones on the right are from a plant that has begun to bolt.  since the leaves are no longer the primary function of the plant, it is spending less energy on them and they are smaller.  even so, they both taste pretty good.

dill is an annual and cannot take any freezing.  it too will shift into seed production each year, usually when the temperatures hit the high points in mid summer.  in my garden, i remove the flower heads as they form to keep the plant producing edible foliage.  like many other plants, dill can also help attract beneficial insects to the garden so if you let some of it flower, do not despair.  those flower heads will help bring in ladybugs, parasitic wasps and tachinid flies.

pick the herbs early in the day when the plants are not wilting from the sun.  wash them by letting them soak in cold water, give it a swish or two.  let them sit for a while so the soil has a chance to sink to the bottom of the bowl.  carefully lift the leaves out and dry them before using.  trial and error has led me to using my salad spinner to dry the leaves if i have a lot.  for small amounts, such as what this recipe calls for, i spread them out on a clean, dry towel and then roll it up to remove the moisture.  chopping by hand requires a little effort and a sharp knife.

buttermilk ranch dressing
yields about 1 1/2 cups

1/4 cup mayonnaise
2 teaspoons freshly squeezed lemon juice
1 tablespoon freshly chopped chives
1 tablespoon freshly chopped dill
1 tablespoon freshly chopped parsley
1/2 teaspoon salt
1/4 teaspoon dry mustard
1/4 teaspoon granulated (or powdered) garlic (dried, fresh will turn quickly in this)
1/8 teaspoon black pepper, ground 
1/8 teaspoon smoked paprika
1 cup buttermilk

in a mixing bowl, whisk the mayonnaise with the lemon juice, spices and herbs to make a thick paste.  carefully whisk in the buttermilk to make a somewhat thin dressing.  chill for an hour to let the flavor develop and the dressing thicken from the fresh lemon juice.  

to make peppercorn ranch, add cracked peppercorns to your taste, a couple teaspoons should do it!


Sunday, July 7, 2013

back on the booch; homemade kombucha

over a year ago, a friend shared some kombucha tea with me.  at this point, i should mention that my friend likes it plain-pure kombucha with nothing else in it.  she also likes to let it ferment for a full 10 days.  it is pungent to say the least.  when i didn't flinch or spit it out, she offered to bring me a baby so i could brew my own.  that is how my kombucha habit got started.  

all through the summer and into the fall, i brewed it and i drank it.  to make it more palatable, i mixed it into iced tea or juice.  then the awful thing happened, i neglected my tea as the weather cooled.  my poor scoby lived in the fridge and after a while, he just couldn't make fermented tea.  this spring, i decided to get another batch going.  my search for a scoby led me to countless websites.  needless to say, i was not willing to fork over the $30+ dollars for a package of culture.  there had to be an alternative.  and there was!  while going from website to website, i stumbled upon the blog, bonzai aphrodite and a detailed post on how to grow a scoby from a store bought bottle of kombucha.  

the following week, i found myself standing in front of a cooler full of kombucha drinks in whole foods market.  after purchasing a bottle of original kombucha, i set up my bowl and began growing my own scoby.  it took the full 2 weeks and it has worked beautifully.  so well that i now have 2 separate scobys, one plain green tea and the other green tea mixed with peach and hibiscus tea.  
the peach-hibiscus kombucha is on the left, the plain green tea is on the right.

when you look at bottom of the scoby, it doesn't encourage an appetite.  it can be a bit slimy too if it sits too long.  the texture of that slime is not something i enjoy-i always remove the slime before drinking it!

my bottles of finished tea, ready to drink.  the amber one is the peach-hibiscus, the pink one is plain kombucha flavored with northlands superfruit juice, a blend of blueberry, blackberry and acai berries.  every day, i make it a point to drink a full glass of the tea.  there are many claims that it boosts your immune system.  whether or not this is true, i cannot say and many health experts are warning against it's use due to the possibility of toxic bacterial contamination.   however, i still enjoy it and when i mix mine, i use glass containers and gloves to handle the scoby.  more importantly, during last winter's horrific flu season, i never even had a sniffle.  just sayin'...

Friday, July 5, 2013

food styling 101 and a strawberry ribbon cake

strawberry ribbon cake
photo by lindsay of love and olive oil
styled by teresa blackburn of food on fifth

learning to use a digital camera can be challenging.  my suggestion, take a few classes.  seriously, check out community colleges or art schools and take a few adult/community education classes on digital photography.  personally, i took basic classes during last summer and then again last fall and having the knowledge of the different camera functions has made a world of difference in my photos.

even so, i am by no means an expert but at least i have a better idea of how to go about things.  just as tricky is making the food look good enough to eat.  another big challenge.  staging a shot, picking props, lighting and so on.  it helps if you have the chance to watch and work with a pro.  when i wrote my first book, i had the chance to watch a very talented food stylist during the photo shoot.  but watching wasn't enough.  when i wrote my second book, i had to actually prepare all of the food to be used in the photo shoots.  even with all of that experience, it still wasn't enough.  but that hasn't stopped my from trying.  

then came an opportunity to take a class with a successful food stylist.  as a member of the nashville food bloggers, i learned about a workshop to be put on by local food stylist, teresa blackburn; i quickly signed up.  we watched in awe as she quickly arranged a salad in a plate.  sounds goofy doesn't it?  but it was how she did things that made it so amazing to watch.  she arranged the salad, leaf by leaf, garnish by garnish.  a drizzle of dressing, addition of background props.  it all came to a beautiful shot.


well beautiful when taken with something besides a cellphone camera!  however, i think you get the idea.  and the next time i try to photograph a salad, i will know exactly how to arrange the components so that it looks good enough to eat! 

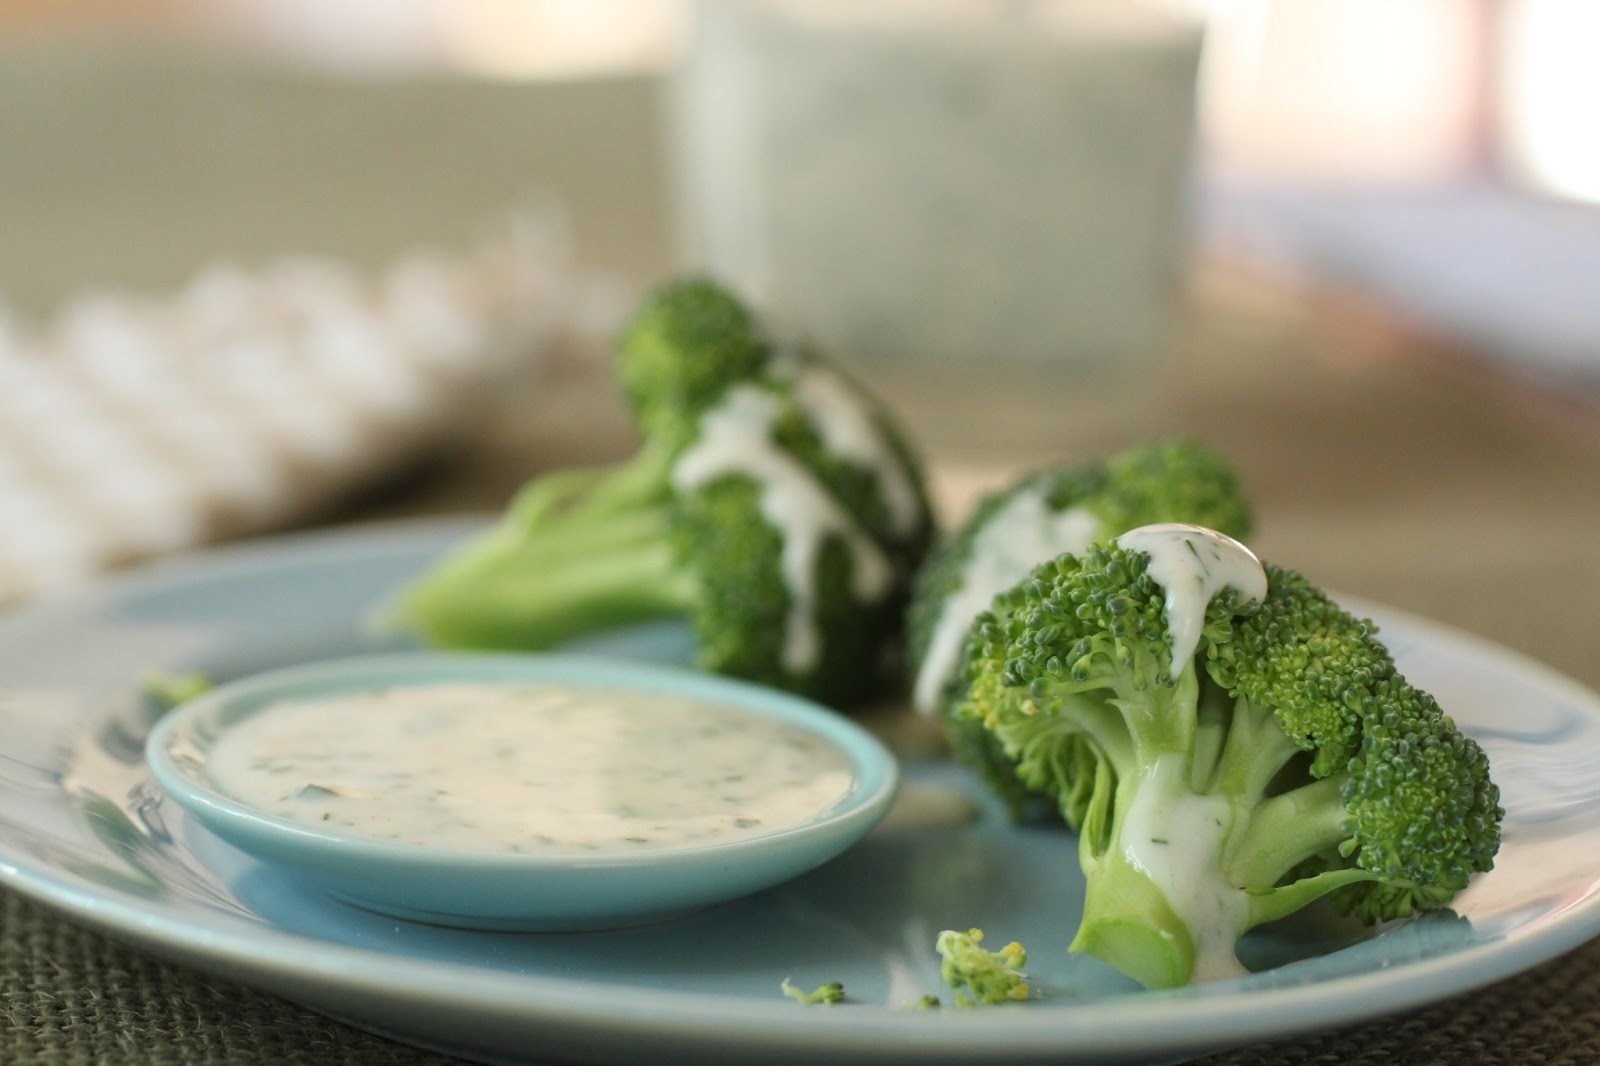
one of the other tricks we learned was how to make the perfect dollop of cream.  first of all, it has to be non dairy whipped topping.  something no pastry chef wants to hear...but the technique was so simple, that i will have to practice it till it's perfect.  but even so, we all had fun smoothing it out, creating furrows across the top and then scooping out the perfect dollop.  

 everyone's plate arranged on the table for a group photo

teresa liked mine enough to use it to demonstrate adding a whole berry so that it will not sink into the cream.  it was all good fun and informative.  hopefully, there will be additional opportunities like this-i love learning something new.   if you are interested in seeing more of the photos, the nashville food bloggers website has a complete album of the photos that lindsay took during the workshop 

since this was a class centered around food, we were all invited to bring along a snack to share.  i brought my strawberry ribbon cake and if you go back to the photo at the top, you can see how wonderful it looked by the time teresa styled it and lindsay shot it.  and as always, when i go to the garden on sunday mornings, i take a cake.  this time, i took the leftover strawberry ribbon cake and tried to use some of the tips and tricks to get a good photo.  it was a challenge.  the lighting in the garden wasn't the greatest and i was unable to bring any props.  but i must say, i at least know how to go about this better.  
strawberry ribbon cake
makes 1 (8") square cake
adapted from the cake bible by rose levy beranbaum
(sour cream coffee cake)

crumb topping
1/4 cup dark brown sugar
1/2 cup nuts-your choice
3/4 teaspoon cinnamon
1/4 cup cake flour
2 tablespoons unsalted butter, cold and cut into cubes

cake batter
2 eggs
2/3 cup buttermilk
1 1/2 teaspoons vanilla
2 cups cake flour
1 cup sugar
1/2 teaspoon baking powder
1/2 teaspoon baking soda
1/4 teaspoon salt
6 ounces unsalted butter, softened
1/2 cup strawberry preserves
powdered sugar

preheat the oven to 350.  grease and flour an 8" square baking pan.  to make the crumb topping, place all of the ingredients in the bowl of a food processor and pulse to chop the nuts and continue pulsing until it begins to clump.  don't over do it or it will be one large clump rather than free flowing smaller lumps.  set this aside while you prepare the cake.

in a small mixing bowl, whisk the eggs with 1/4 of the buttermilk and the vanilla, set aside.  place the dry ingredients in a large mixing bowl and with the machine on low, allow it to mix to combine the ingredients.  add the butter and the remaining buttermilk and mix on low to combine.  scrape the bowl and turn the mixer to medium and allow it to cream until a little light and fluffy, 1-2 minutes.  add the egg mixture in thirds and mix to combine.  be sure to scrape the bowl.  scrape half of the batter into the prepared pan and smooth out the top.  spread the preserves evenly over the top of the cake.  add the remaining batter and carefully spread it evenly over the preserves-this is a little tricky so take your time. top it all off by sprinkling the crumb mixture over the top.  bake until a pick comes out clean, about an hour.  allow the cake to cool in the pan for 15-20 minutes.  turn it out and invert it onto a rack to cool completely.  just before serving, dust it generously with the powdered sugar.

Tuesday, July 2, 2013

baked yogurt tart with summer fruit; a tuesdays with dorie post


what's in a name?  when it comes to a menu or a recipe title, everything.  the title "baked yogurt tart" just does nothing for me.  a picture would help sell it but the publisher must have decided not to include one, too bad, it might have helped.  might being the key word.

so shy would i bother to make one?  curiosity and a husband who never fails to ask me, "what's for dessert?" after every dinner we have together.  the catch, neither one of us eats much dairy.  sure a splash of half and half in coffee or a little butter on toast, maybe the occasional slice of cheese but a slice of a yogurt filled tart?  not likely.  while i tolerate it better than my husband can (physically-as in gastrointestinal abilities), i still prefer to avoid it since i generally feel better if i do.  the only way i could make this would be to use a soy or coconut yogurt.  honestly, neither one is something i eat much of just because of the long list of stuff they add to it to give it a texture similar to real dairy yogurt.  but since i want to bake along with the tuesdays with dorie followers and i know my husband will ask that burning question, i baked the tart.  

the recipe is easy to follow.  it calls for 1/4 of the pie dough recipe.  i cheated.  i had two prebaked mini pie shells in the freezer; i thawed them for the recipe.  to make the filling, i mixed up 1/3 of the recipe which resulted in the perfect amount for 2 little pies.  for the fruit, i topped one with peach slices and the other with strawberry slices.  the baking time had to be reduced to 25-30 minutes and they came out of the oven a tiny bit jiggly in the center.  they set up just fine.  the only criticism, they look rather dry and a little leathery on top.  i may have to brush a little warm honey over them before serving.  

to see the full recipe, check out this great website from a la carte communications.  and as always, to see the what the other bakers came up with, be sure to visit the tuesdays with dorie page.
coconut yogurt looks a lot like regular low-fat yogurt.  it has a lot of vegetable stabilizers in it to accomplish that so it is hardly an unprocessed food.  the taste was more vanilla than coconut but even more surprising was just how sweet it was since it was labelled "plain."

 i love that the recipe was so easy to divide.  i just needed one egg.

 yeah, it was a lazy day in my kitchen; the hand mixer came out for this recipe.

 i love summer fruit, i was able to control myself and slice enough of it for the tarts.

 looking good

 fresh from the oven-pretty!

 the fruit looks a little dry and leathery.  it needs a little glaze over the top to give it a shine.

if my husband is lucky, i will let him have a bite or two...